Set up your iPad
When setting up your iPad you will notice that there are quite a few steps involved. Fortunately, there are some steps that can be skipped over for now and adjusted later on in the Settings app if you choose. Below is a video going through each step in the set up process. You will notice that some steps will be skipped over, but we will provide you the resources you need to edit any settings that you would like to in our next lesson. This video will demonstrate how to navigate through the entire setup process so that you can get to the homepage of your iPad and start using it!
Scroll down and click on the play button on the video to start it. The play button looks something like this.
Remember: you can rewind and pause the video if you need to.
How to setup your iPad
Wow, thanks Agent! If you need to review any of the steps from the video, they are all listed below for you.

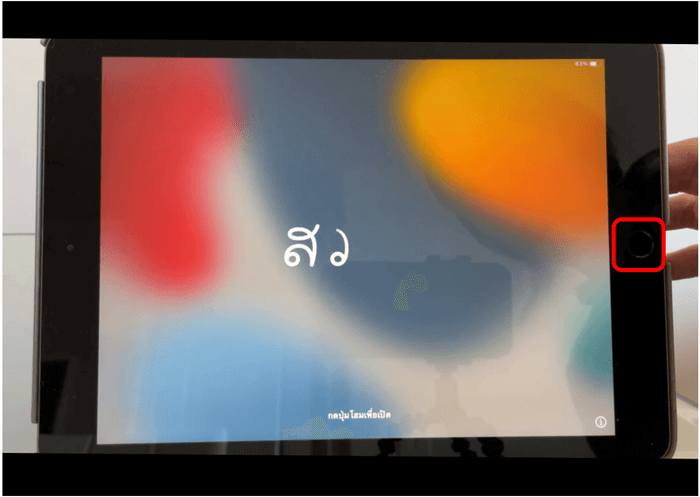
Step 1: The first screen you will see is the welcome screen where the word “Hello” will flash across in different languages. Press your home button or swipe upwards to start the setup process. In the photo below the iPad is positioned horizontally so the home button is on the right side. Depending on how you hold your iPad your home button will be on the side or on the bottom of the iPad.
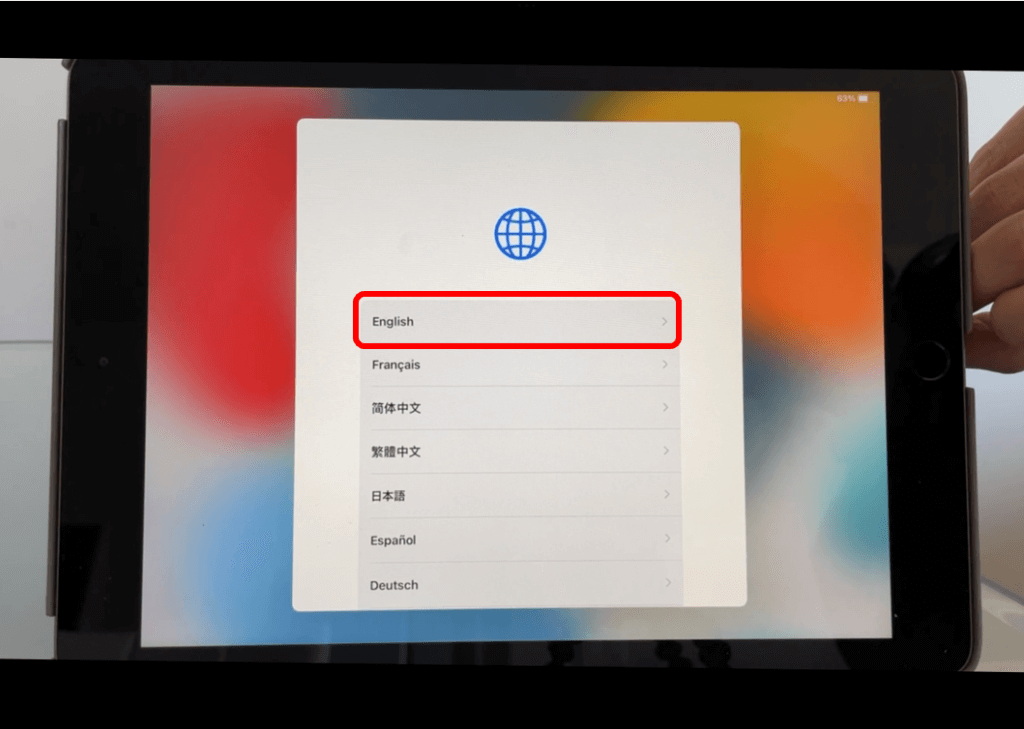
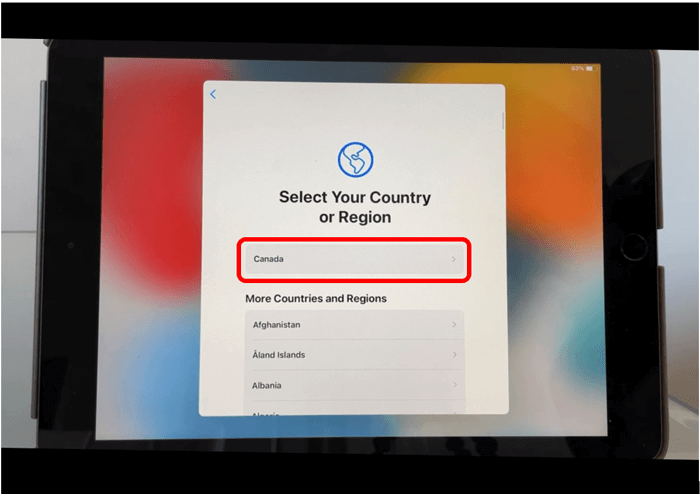
Step 2: Choose your language. You will see a list of all the languages that are available on the iPad. Choose which one is best suited for you and tap on it. Once you choose your language you will be asked to choose your Country. Find the country that you live in and tap on it.
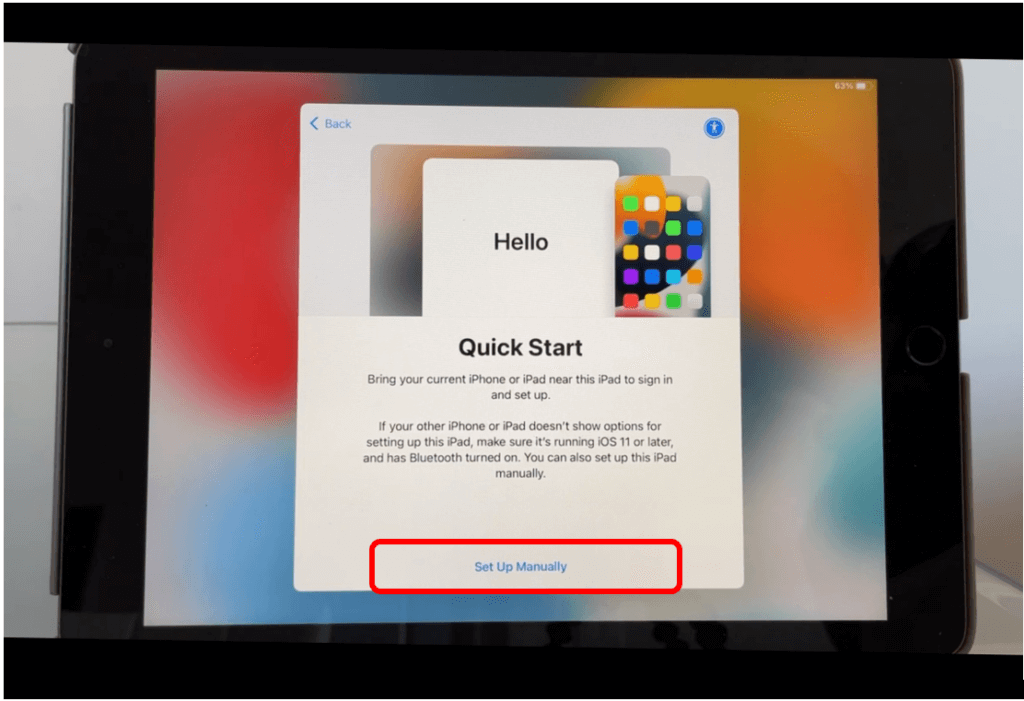
Step 3: From the Quick Start screen, we are going to tap on Set Up Manually. If you already own an iPad and are upgrading from a previous one, the other option allows you to transfer your data on to your new iPad. For this lesson we will demonstrate how to set up your iPad manually.
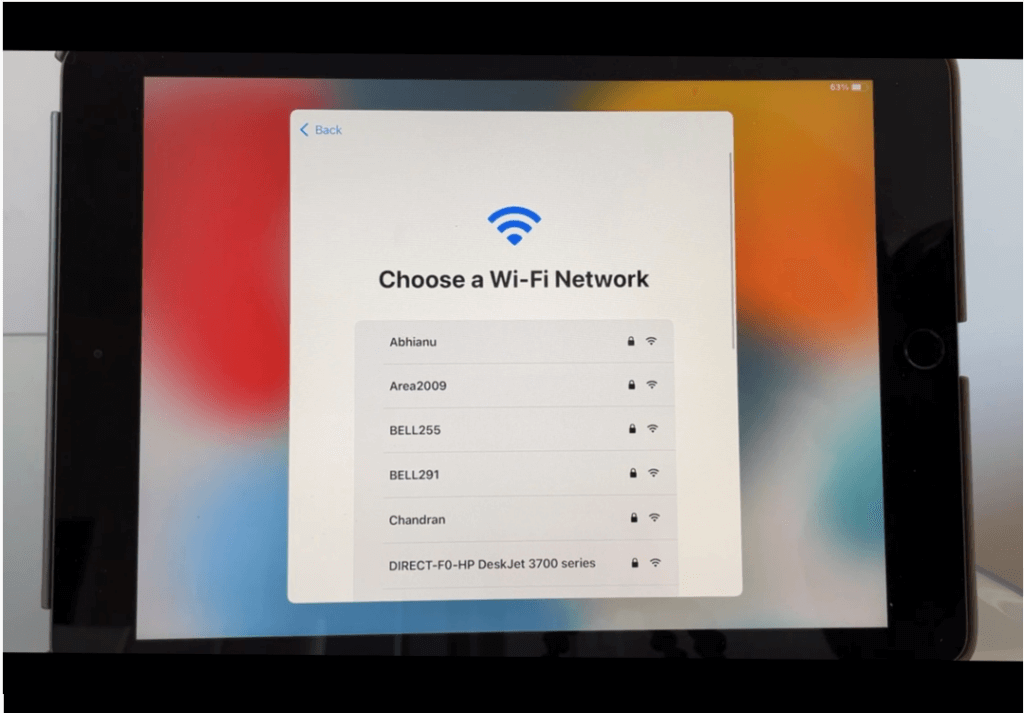
Step 4: WiFi – To use your iPad to download apps, browse the internet, and send messages and emails you will need to be connected to WiFi. Choose the WiFi network that you have access to from the list and tap on it. Note: the networks that are available to you will be different than the ones in the photo below.
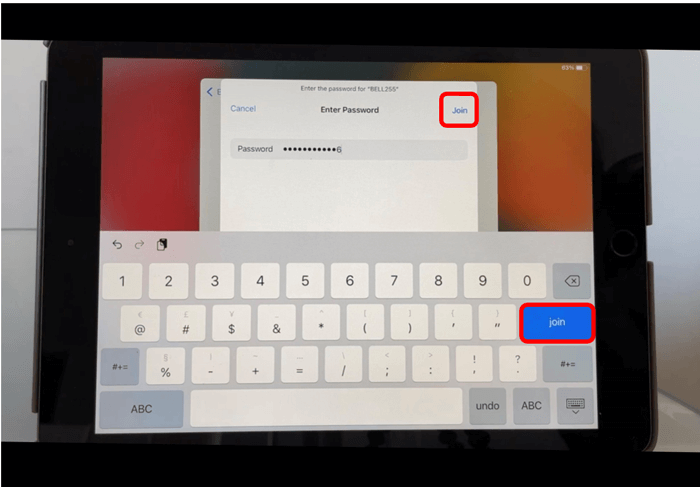
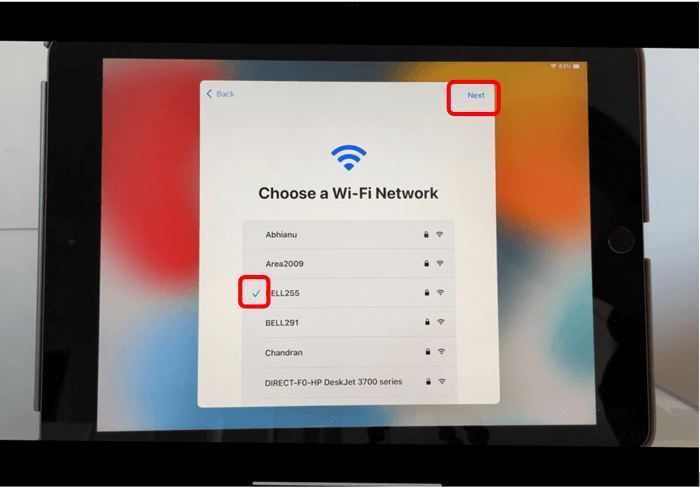
You will then be asked to input the password for that network. Once you have typed in the password, tap on Join in the top right corner of the screen or on your keyboard. It may take a few seconds to connect but once it has a blue check mark will appear beside the Network name. Tap on Next in the top right corner of the screen.
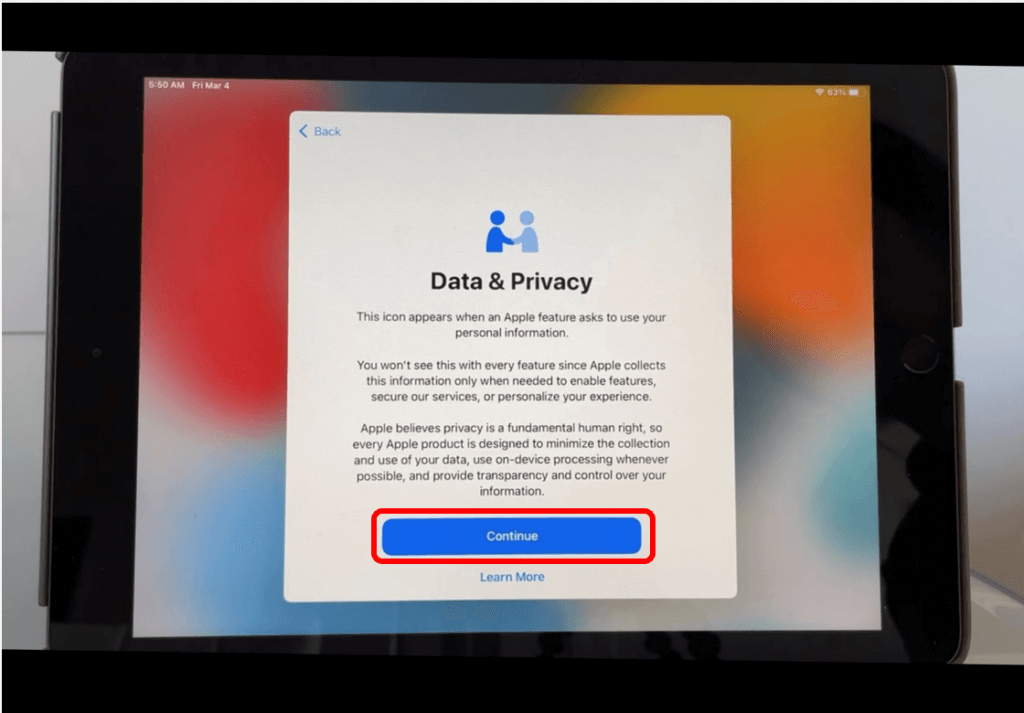
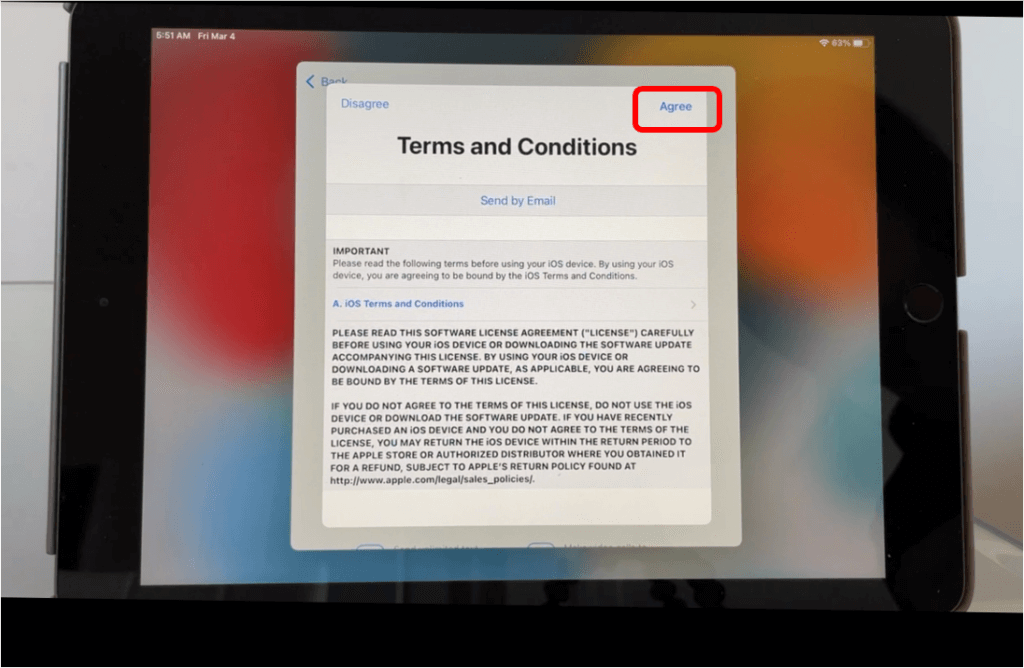
Step 5: You will see an explanation of the Data and Privacy icon that will appear when a feature asks you to use personal information. Once you have read the details, you can learn more about Data and Privacy by tapping on Learn More or tap Continue to move to the next screen. For this demonstration we will tap on Continue.
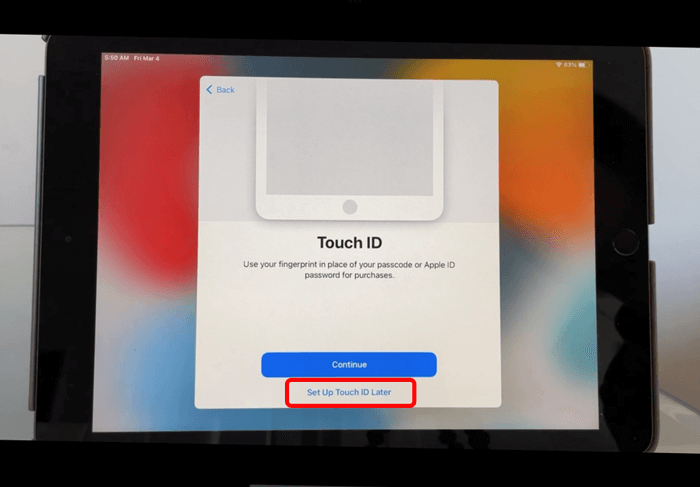
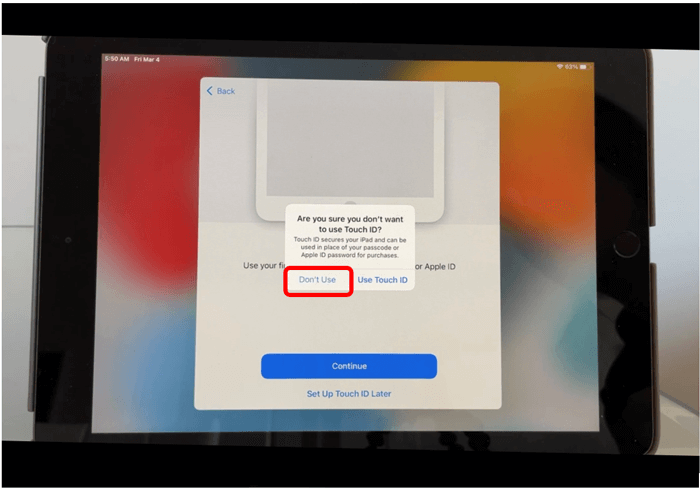
Step 6: The next step in the setup process is setting up Touch ID. Touch ID allows you to access your iPad by using your finger print for authentication. For this demonstration we will choose the option to Set up Touch ID Later, then tap on Don’t Use. If you are interested in learning more about Touch ID and viewing the steps on how to set it up, check out the next lesson titled Additional Set Up Features.
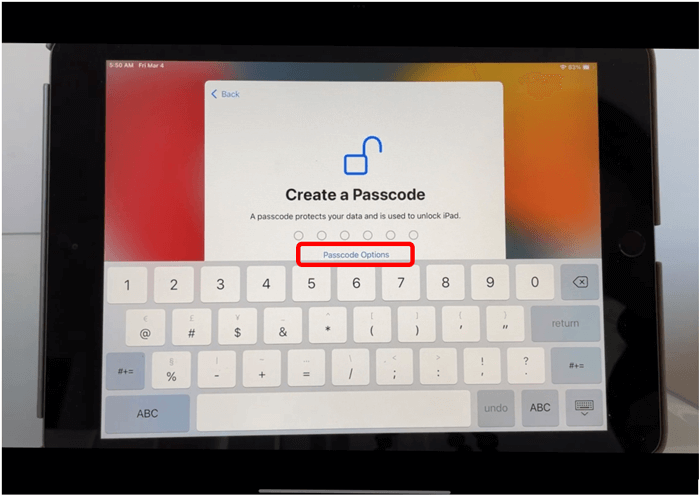
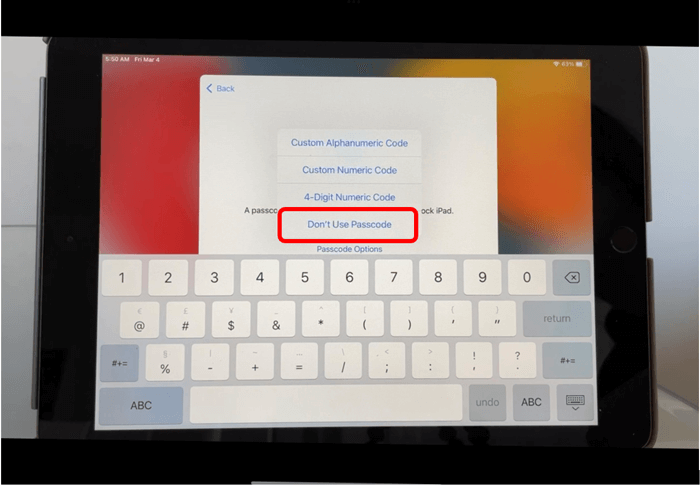
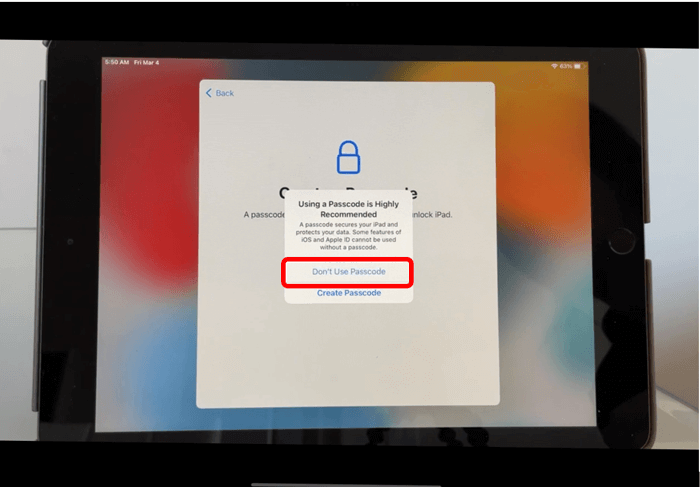
Step 7: Now you will have the option to create a passcode for your iPad. This is a string of characters or digits that you will set to get into your iPad. We encourage you to set up a passcode to prevent others from getting into your iPad. For this demonstration we will show you how to skip this step but if you are interesting in learning how to create a passcode, check out our next lesson. For now, tap on Passcode Options, then tap on Don’t Use Passcode, then tap on Don’t Use Passcode once more.
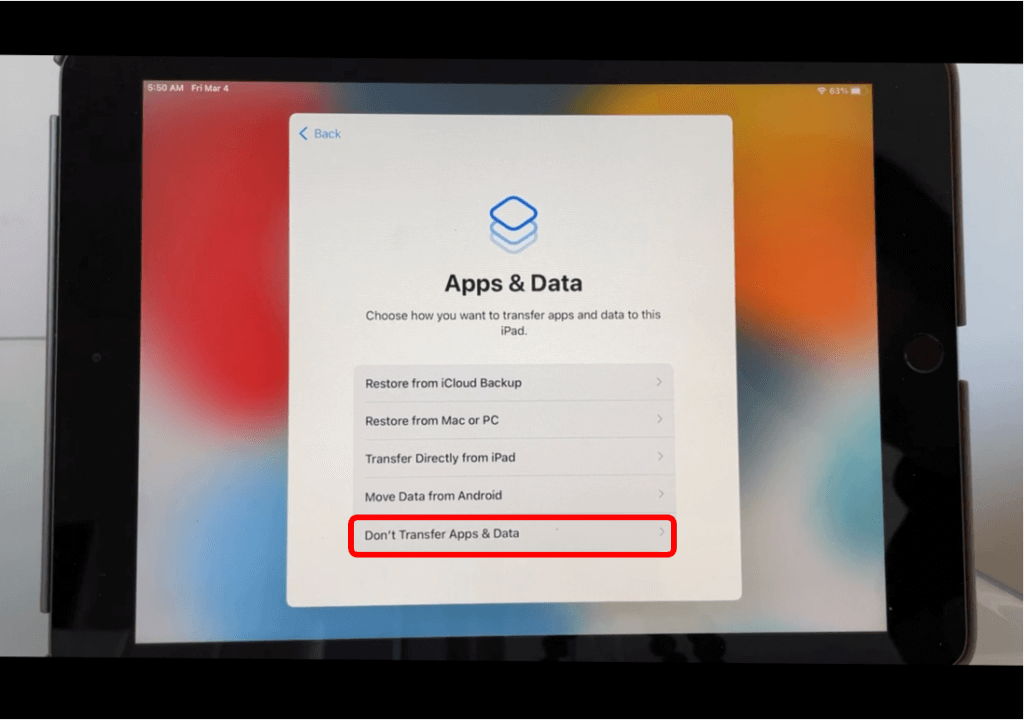
Step 8: Choose how you want to transfer apps and data to your iPad. If you have a device already and would like to transfer the data to your new iPad, choose from the list of options. For this demonstration we are going to choose the option titled, Don’t Transfer Apps and Data.
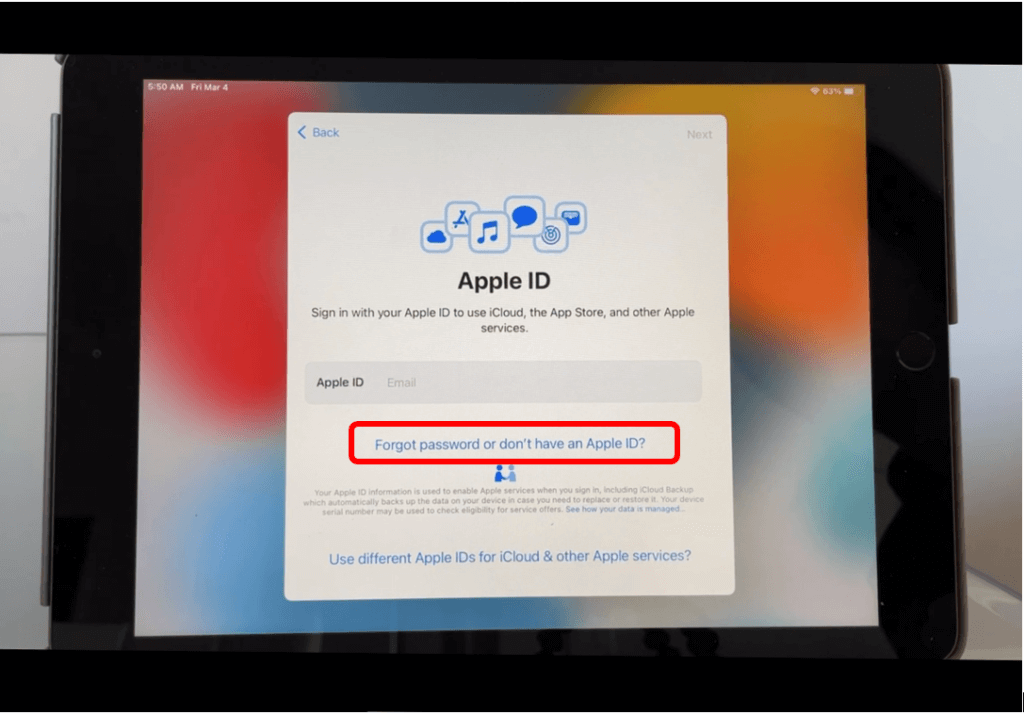
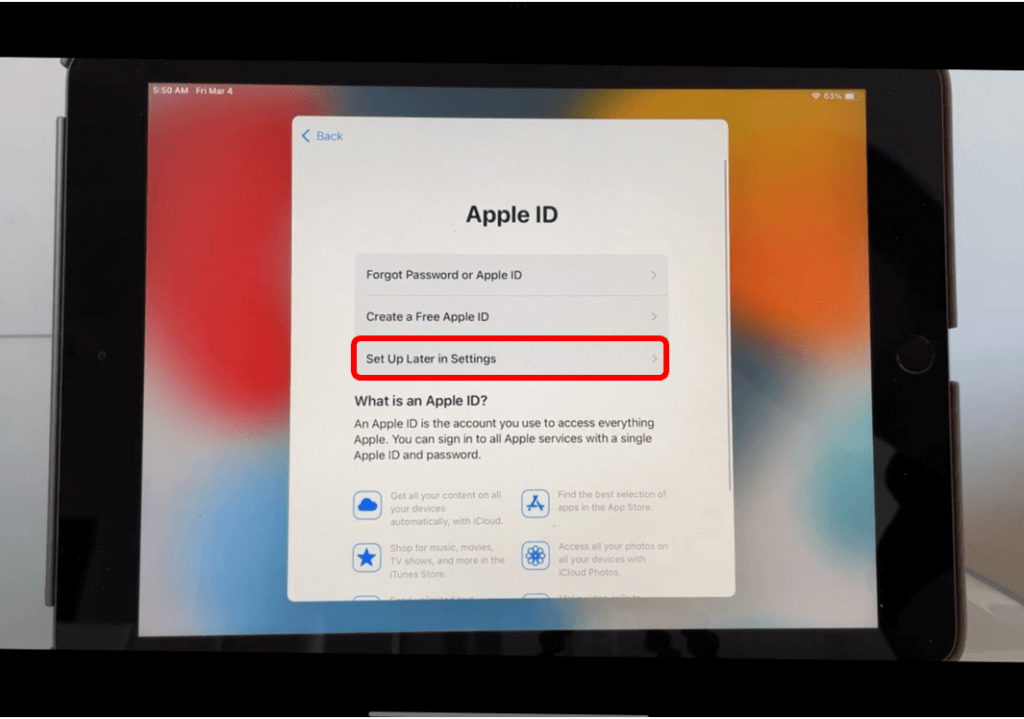
Step 9: If you already have an Apple ID, type it into the space provided. If you do not have one, tap on the option titled, Forgot password or don’t have an Apple ID. From the menu that appears on the screen, choose Set up Later in Settings. In our next lesson, we will discuss in detail what an Apple ID is and provide you with a link to view the steps on how to create one.

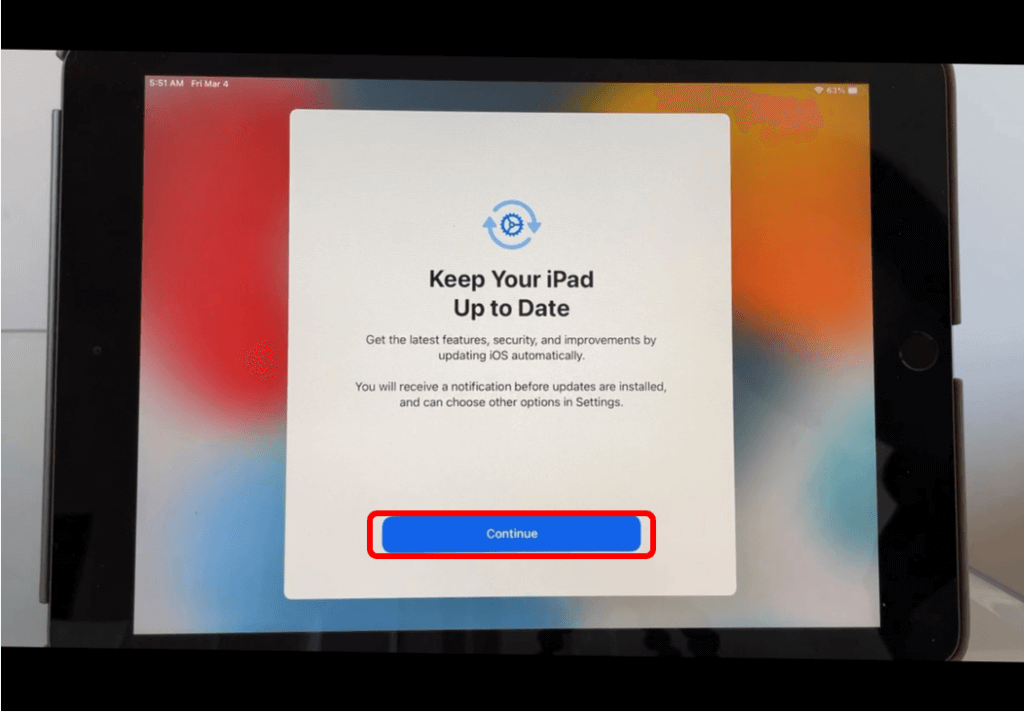
Step 10: A message will appear on the screen about keeping your iPad up to date. This is just explaining that your software updates will be completed automatically. For more on Software Updates, check out our lesson in the Get to know your iPad Course. Tap on Continue.
Step 11: Tap on Enable Location Services. This will allow GPS apps such as Maps use your approximate location and you can use services such as Find My which will help locate your device if you ever misplace it. If you don’t want to turn on Enable Location services, tap on Disable Location Services.

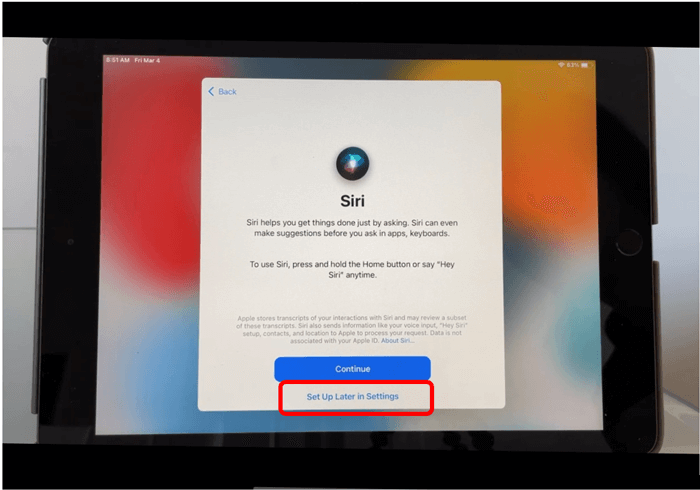
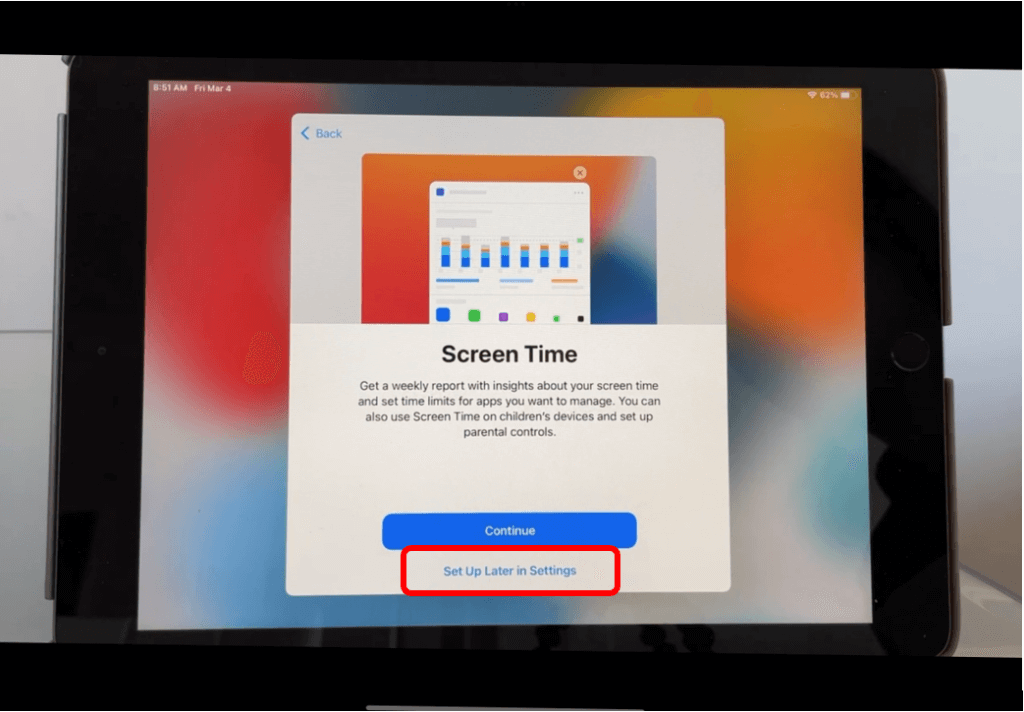
Step 12: Tap on Set up Later in Settings for Siri and Screen Time. If you would like to learn more about Siri and Screen Time and how to set it up, check out our next lesson!
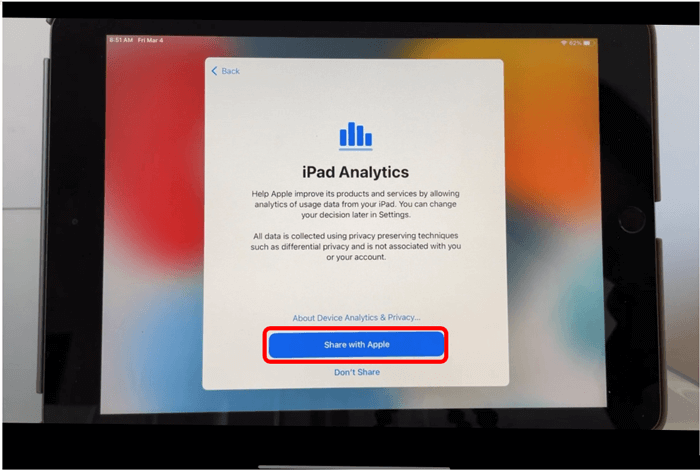
Step 13: Analytics– Tap on Share with Apple. If you do not want to share analytics from your device with Apple, tap on Don’t Share. If you want to learn more, tap on Learn More. To share App Analytics with App developers, tap on Share with App Developers. If you do not want to share with App Developers, tap on Don’t Share.

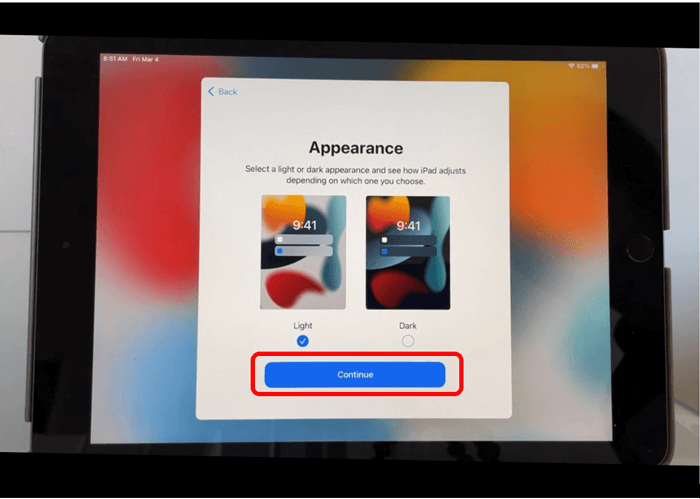
Step 14: Now you will have the option to choose the appearance of your screen. You can choose a light appearance or dark. This is personal preference and can be changed at any time while using your iPad. Choose the one you would like, then tap on Continue.
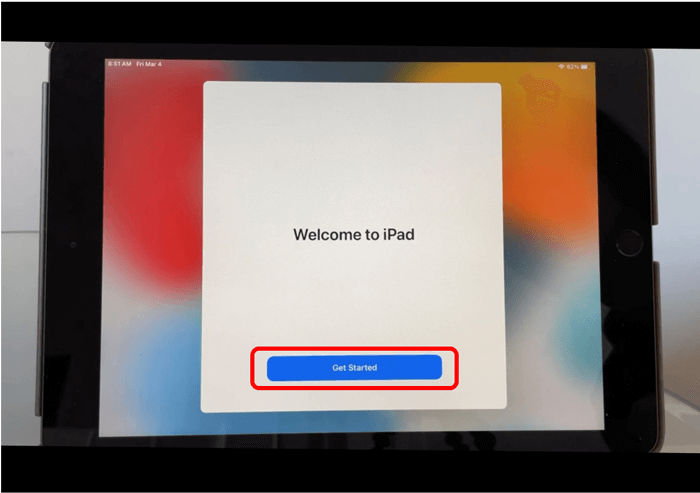
Step 15: For the final step in the iPad set up process, tap on Get Started to go to your home screen.
Congratulations for successfully setting up your iPad! I bet you can’t wait to start using it. As mentioned throughout this lesson, there are some features that we skipped over during the setup process. Let’s move on to the next lesson to learn more about these specific features. See you over there!